PyRTL
PyRTL is a collection of classes that provide simple RTL specification, simulation, tracing, and testing, suitable for teaching and research. Simplicity, usability, clarity, and extensibility are overarching goals, rather than performance or optimization. With PyRTL you can use the full power of Python to describe complex synthesizable digital designs, simulate and test them, and export them to Verilog.
Quick links
Get an overview from the PyRTL Project Webpage
See some PyRTL Examples
File a Bug Report or Issue
Contribute to the project on GitHub
Installation
PyRTL is availble in PyPI and can be installed with pip:
$ pip install pyrtl
Design, Simulate, and Inspect in 15 lines
 1import pyrtl
 2
 3a = pyrtl.Input(name="a", bitwidth=8)  # Input "pins".
 4b = pyrtl.Input(name="b", bitwidth=8)
 5q = pyrtl.Output(name="q", bitwidth=8)  # Output "pins".
 6gt5 = pyrtl.Output(name="gt5", bitwidth=1)
 7
 8result = a + b  # Makes an 8-bit adder.
 9q <<= result  # Assigns output of adder to output pin.
10gt5 <<= result > 5  # Compare and assign result to output pin.
11
12# Simulate and display waveforms in the terminal.
13sim = pyrtl.Simulation()
14sim.step_multiple({"a": [0, 1, 2, 3, 4], "b": [2, 2, 3, 3, 4]})
15sim.tracer.render_trace()
After installing PyRTL, you can copy and paste the code above into a Python interpreter. You should see simulation waveforms drawn right in your terminal:
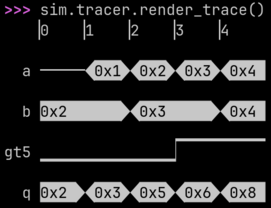
Line 14’s call to Simulation.step_multiple() runs the simulation for
five cycles, providing input values for a and b for each cycle. For
example, in the second cycle, a will be 1 and b will be 2. The
five cycles are numbered 0 to 4 in the first line displayed by
render_trace().
render_trace()’s last line shows that q is 0x3
in the second cycle, which is the result of computing a + b. And the
second-to-last line shows that gt5 is low in the second cycle, which is the
result of computing a + b > 5.
While a great deal of work has gone into making hardware design in PyRTL as friendly as possible, please don’t mistake that for a lack of depth. You can just as easily export to Verilog or other hardware formats, view results with your favorite waveform viewer, build hardware transformation passes, run JIT-accelerated simulations, design, test, verify hugely complex digital systems, and much more. Most critically of all it is easy to extend with your own approaches to digital hardware development as you find necessary.
Overview of PyRTL
If you are brand new to PyRTL we recommend that you start with the PyRTL Code Examples which will show you most of the core functionality in the context of a complete design.
WireVectors
Perhaps the most important class to understand is WireVector, which is the
basic type from which you build all hardware. If you are coming to PyRTL from Verilog, a
WireVector is closest to a multi-bit wire. Every new WireVector
builds a set of wires which you can then connect with other WireVector through
overloaded operations such as __add__() or
__or__().
A bunch of other related classes, including Input, Output,
Const, and Register are all derived from
WireVector. Coupled with MemBlock (and RomBlock),
this is all a user needs to create a functional hardware design.
After specifying a hardware design, there are then options to simulate your design right in PyRTL, synthesize it down to primitive 1-bit operations, optimize it, and export it to Verilog (along with a testbench).
Simulation
PyRTL provides tools for simulation and viewing simulation traces. Simulation
is how your hardware is “executed” for the purposes of testing, and three
different classes help you do that: Simulation,
FastSimulation and CompiledSimulation. All three have
almost the same interface and, except for a few debugging cases, can be used
interchangeably. Typically one starts with Simulation and then moves
up to FastSimulation when performance begins to matter.
Both Simulation and FastSimulation store a list of each
wire’s value in each cycle in Simulation.tracer, which is an instance
of SimulationTrace. Traces can then be rendered to the terminal with
SimulationTrace.render_trace().
SimulationTraces can be handled in other ways, for
example they can be extracted as a test bench with
output_verilog_testbench(), or exported to a VCD file with
print_vcd().
Optimization
WireVector and MemBlock are just “sugar” over a core set of
primitives, and the final design is built up incrementally as a graph of these
primitives. WireVectors connects these “primitives”,
which connect to other WireVectors. Each primitive is a
LogicNet, and a Block is a graph of
LogicNets. Typically a full design is stored in a single
Block. The function working_block() returns the block on
which we are implicitly working. Hardware transforms may make a new
Block from an old one. For example, see PostSynthBlock.
Errors
Finally, when things go wrong you may hit an Exception, neither of which is
likely recoverable automatically (which is why we limited them to only two types).
PyrtlError is intended to capture end user errors such as invalid constant
strings and mis-matched bitwidths. In contrast, PyrtlInternalError captures
internal invariants and assertions over the core logic graph which should never be
encountered when constructing designs in the normal ways. If you hit a confusing
PyrtlError or any PyrtlInternalError feel free to file an issue.